Map of Pickett's Charge – Jespersen
This work is licensed under the Creative Commons Attribution 3.0 License.
Attribution: Map by Hal Jespersen, www.cwmaps.com
| Andrew Weigel | Walking Pickett's Charge |
If you have a particular interest in the Battle of Gettysburg, and particularly if you have an interest in Pickett's Charge, it is well worth your time to walk the route of the Charge (straight line it's no more than a mile). It doesn't take long (an hour or so at a leisurely pace for the round trip), it's not difficult (I've seen people do it on crutches), and it's not a bad excursion even if you're not interested in the battle.
If you're not convinced to walk the route, it is still interesting to stand on either the Union or Confederate lines and watch the progress of walkers through a pair of binoculars. This will give you some sense of what the officers saw during the battle.
This is a page about geography – the geography of this battle – rather than the battle itself.
If there's a point to this page, it's that the ground is a lot more uneven than you probably think, particularly from the viewpoint of those involved in a battle. The first time you walk the route you notice this. And if you walk it with an eye to visibility and range of vision, to communication and coordination, it comes to seem even more uneven. And this has an impact on the conduct and outcome of the battle.
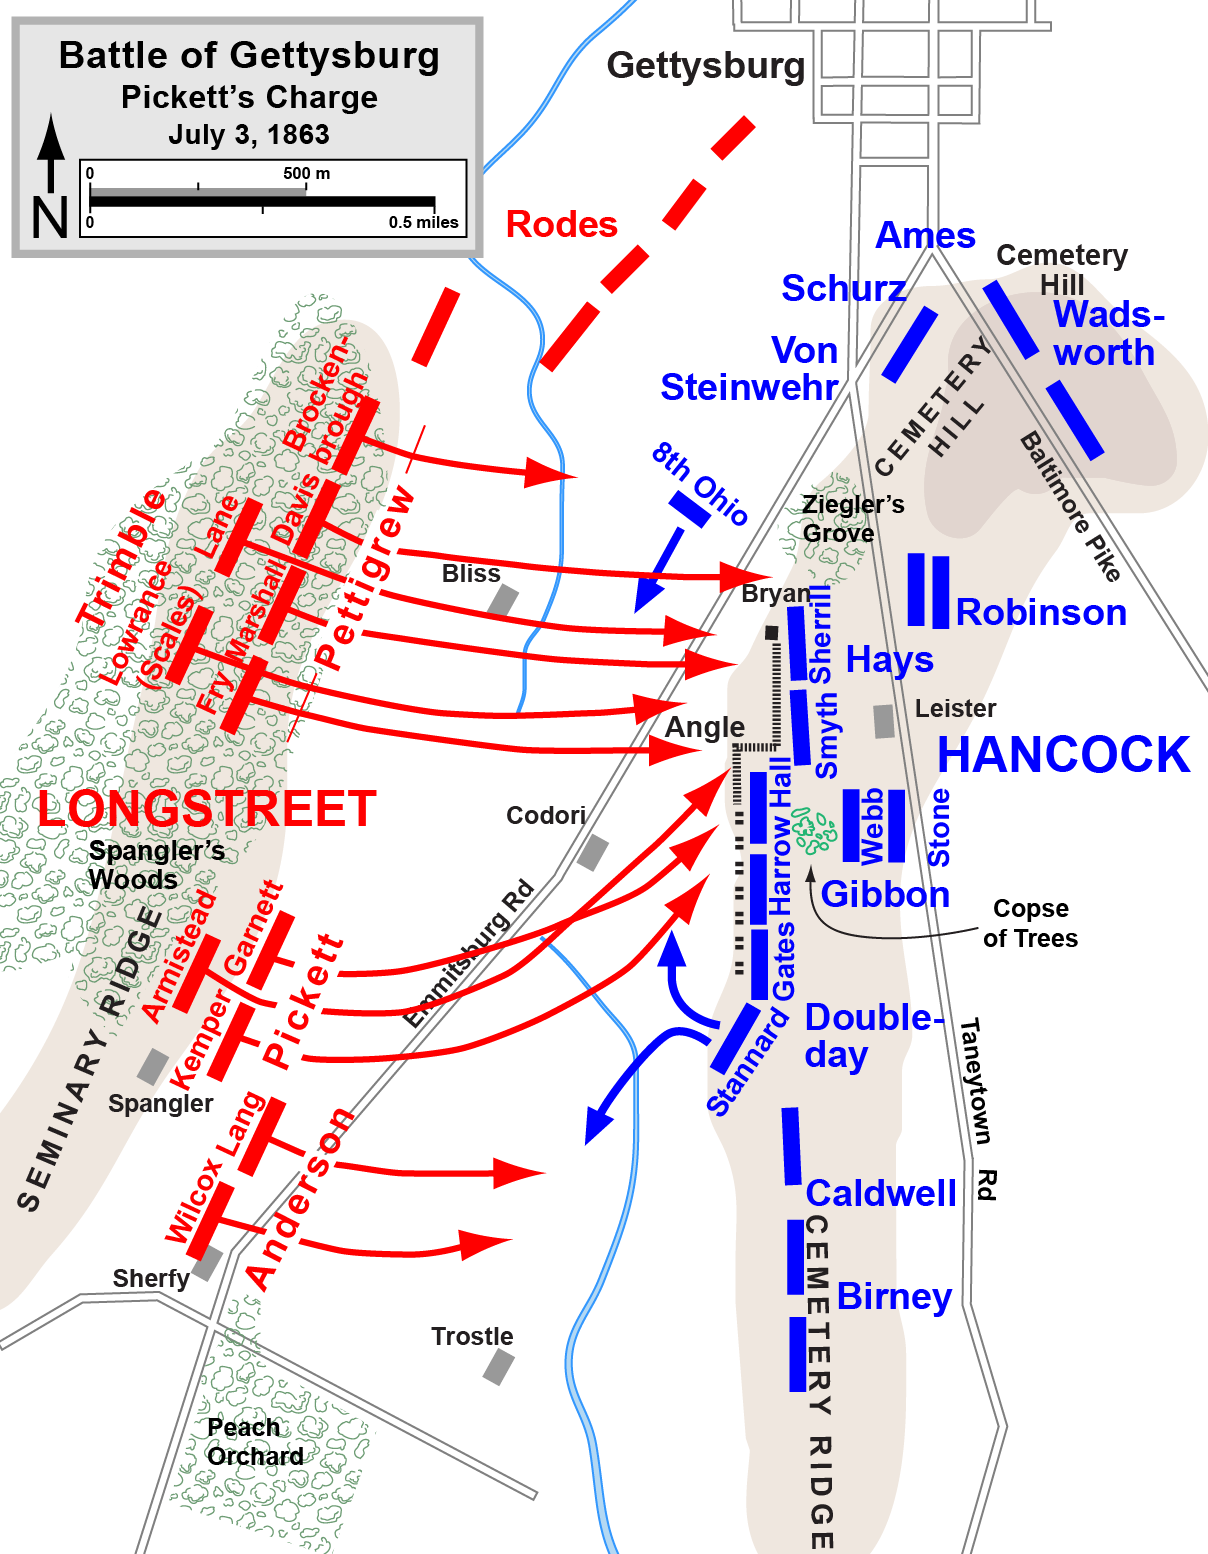
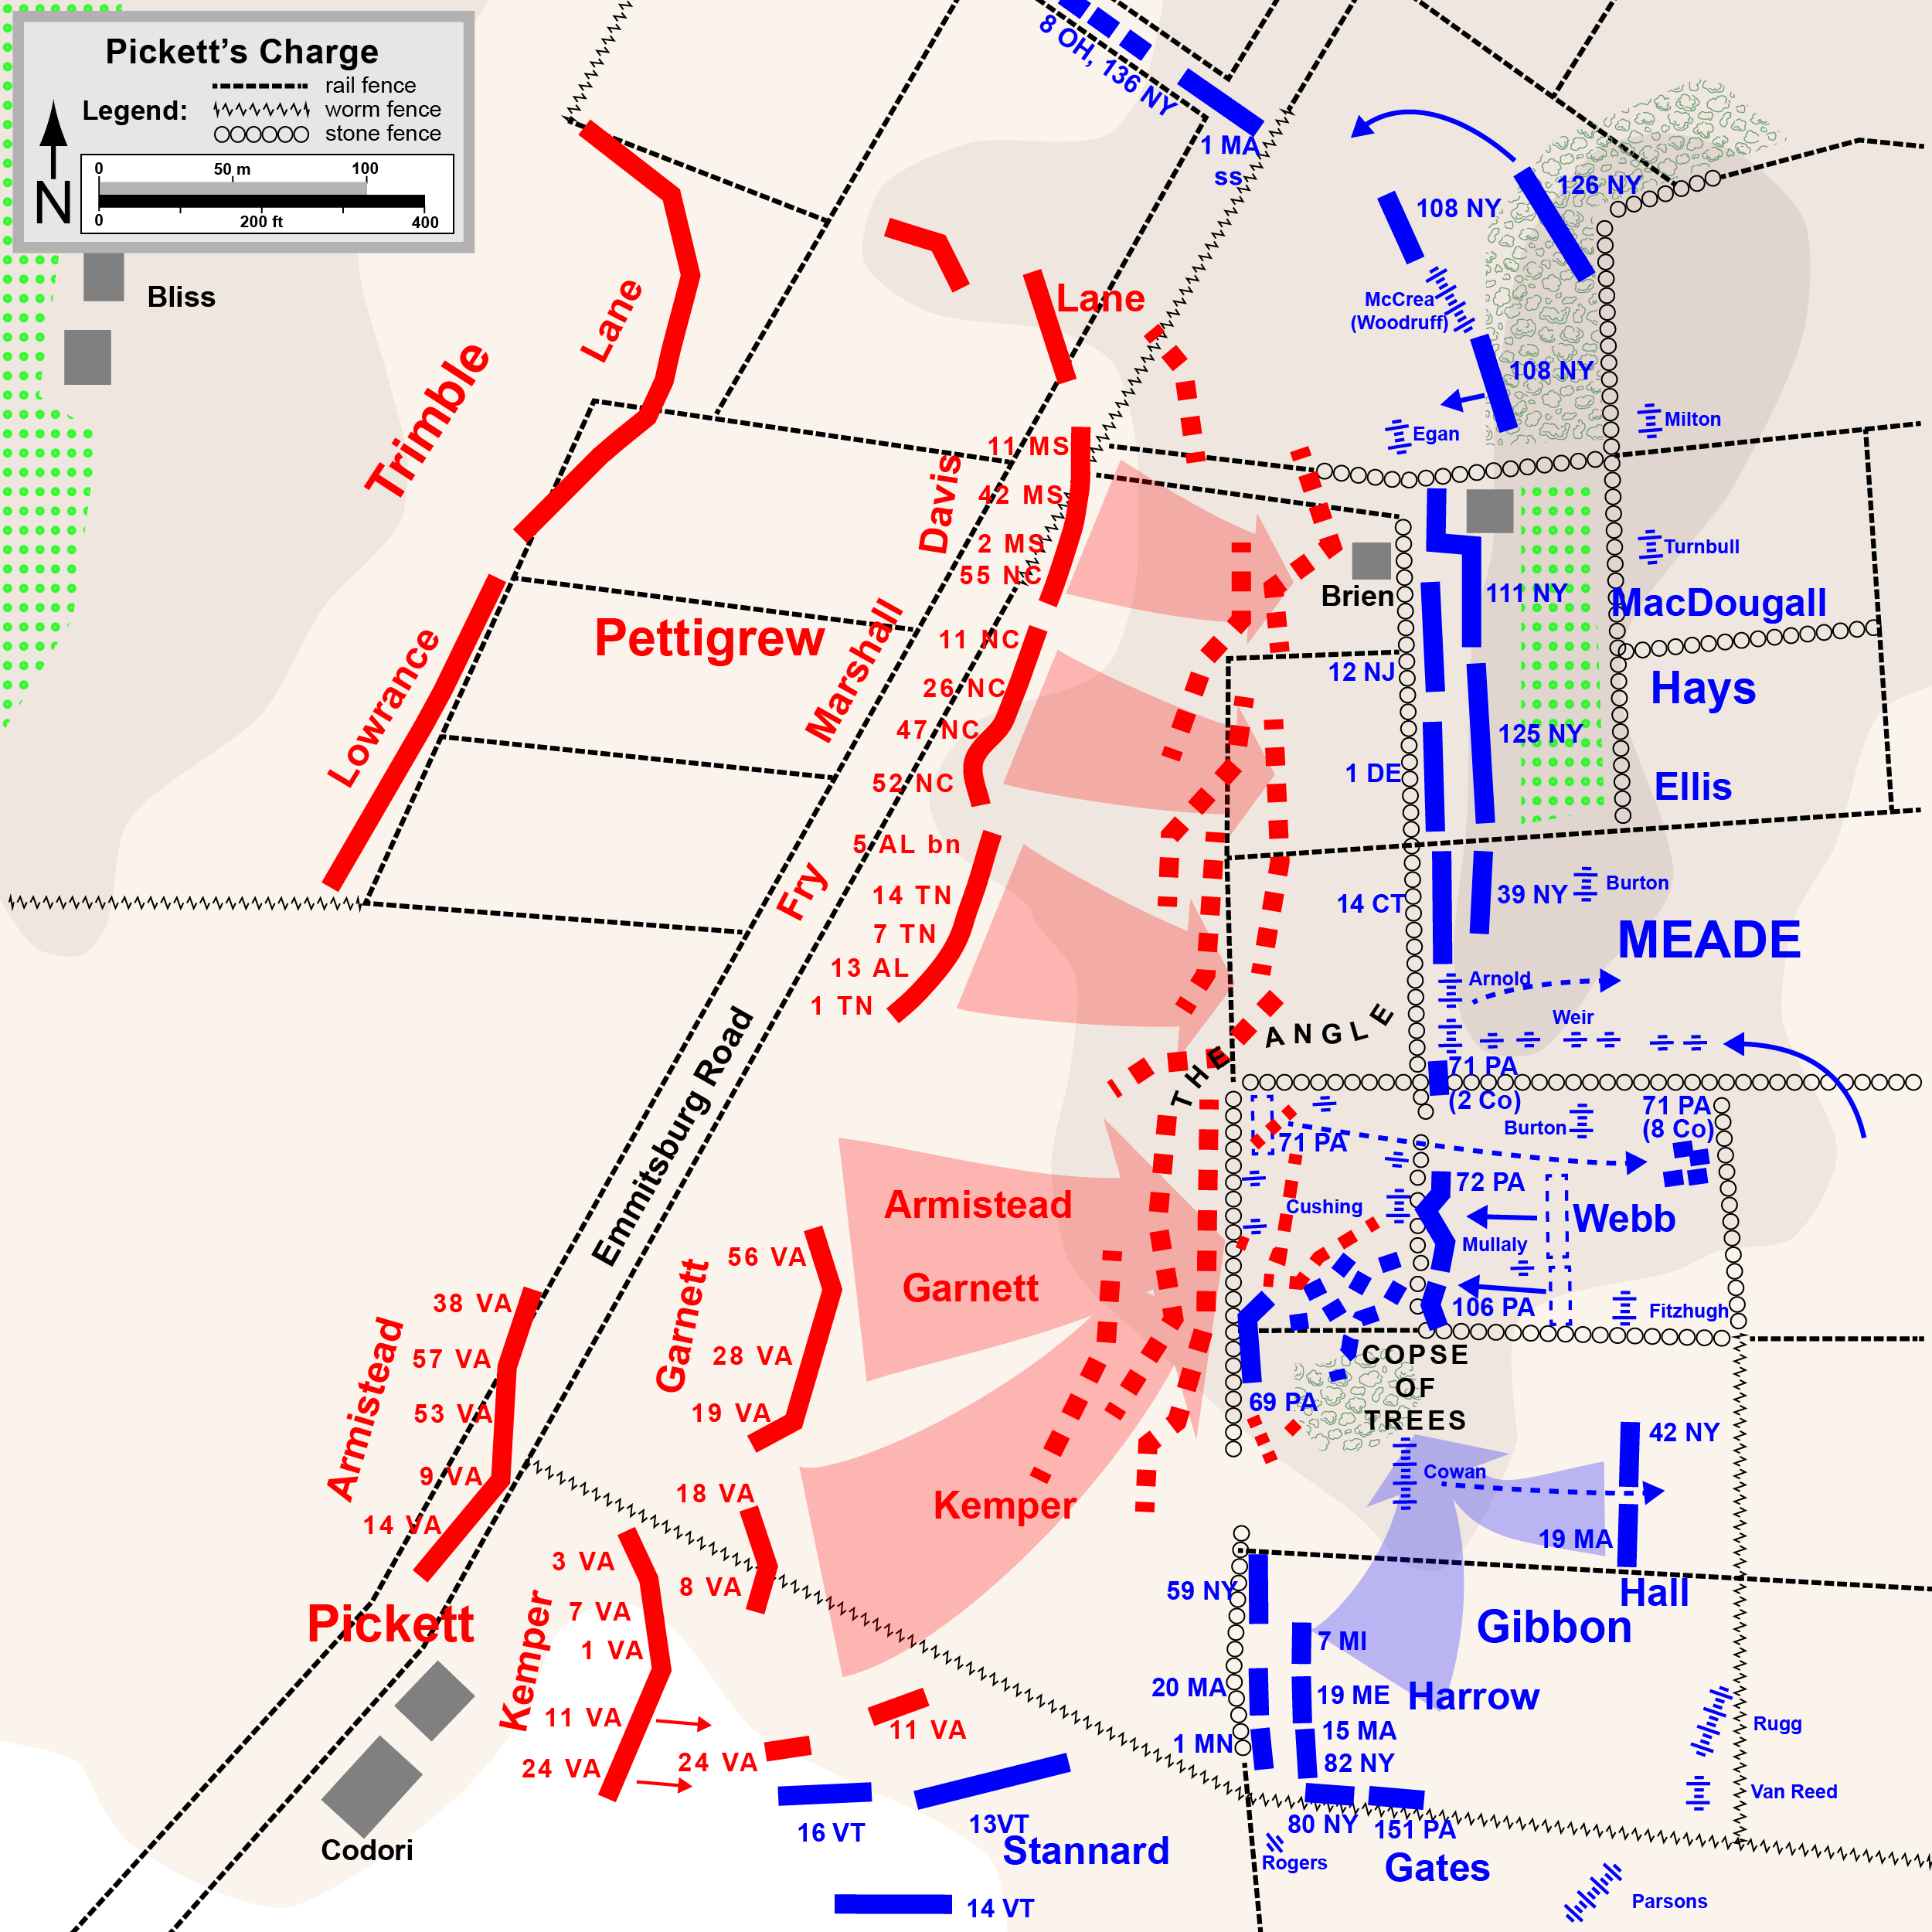
There are innumerable resources on Pickett's Charge, and many on-line. But since we're concerned primarily with geography, maps are of the most use. To the right are two maps drawn by Hal Jespersen (used in the Wikipedia article on Pickett's Charge), followed by one from the Civil War Preservation Trust (CWPT).
If you're going to walk the Charge, you will almost certainly have the Gettysburg Battlefield Map produced by the National Park Service and available at the Visitor Center. It's a large PDF file, so you'll probably want to open it in another tab or browser window.
If you need just one reference for the Charge itself, you can refer to Wikipedia: Pickett's Charge.
Map of Pickett's Charge – Jespersen |
|
|
|
Click on the map to bring up the full-size image.
This work is licensed under the Creative Commons Attribution 3.0 License. Attribution: Map by Hal Jespersen, www.cwmaps.com |
Map of Pickett's Charge (Detail) – Jespersen |
|
|
Click on the map to bring up the full-size image.
This work is licensed under the Creative Commons Attribution 3.0 License. Attribution: Map by Hal Jespersen, www.cwmaps.com |
Map of Pickett's Charge – CWPT |

|
|
Click on the map to bring up the full-size image.
Attribution: Map by Civil War Preservation Trust, www.civilwar.org |
A natural question is whether the geography we see today resembles that at the time of the battle. The National Park Service addresses this through the project Battlefield Rehabilitation at Gettysburg. It states, "One of the most important purposes of Gettysburg National Military Park is to preserve the topographic, landscape and cultural features that were significant to the outcome of the Battle of Gettysburg." You can read more there about the efforts that have taken, and are taking, place.
In May of 2010 the Visitor Center had a book signing by Barbara Platt, the author of "This is Holy Ground: A History of the Gettysburg Battlefield". The book discusses what happened to the battlefield itself in the century and a half after the battle, and the efforts to restore the battlefield to the way it was at the time of the battle. As mentioned above, the NPS is working on the topography, forestation, and fencing in particular. They've apparently gotten the area of Pickett's Charge fairly close; in particular the fences are similar to those at the time of the battle.
You would expect the ground not to be completely flat, simply because the Charge starts on one ridge (Seminary) and ends on another (Cemetery). But that doesn't nearly capture what it's actually like.
Much of the nature of the area of this battle between the two ridges is determined by the drainage, which runs north to south. Thus the undulations as the Charge proceeded from west to east and back.
Two different routes are illustrated here. The Central Route follows a fairly central path (Archer); the North Route is a more northerly route (Davis, then swinging to The Angle). They are quite different.
The central route is the most popular of the routes that people take. It starts from the Virigina Memorial; this is where General Lee watched the Charge from. It is shorter, easier to walk, and faster than the other routes, having well-defined paths and less vegetation.
After the pictures are some Thoughts based on walking the route of the Charge.
The conditions in these pictures differ from those conditions at the time of the battle for a number of reasons:
It helps to fix the general layout in your mind before you start to walk. As you look out from the Confederate lines:
The pictures are keyed by time. Most stops along the way have two pictures, one zoom and one at the regular setting. The regular setting gives the best idea of what's going on over all, but the zoom gives you a much better sense of how far away from you things are. The regular shots make things seem more distant than they actually are. (The zoom shots are separate pictures taken with an optical, not digital, zoom, so they don't align 100% with the regular pictures.)
Most pictures were taken in the direction of the walk, e.g., east (or forward) on the way out. Sometimes, however, the pictures are taken back the way you came to give another perspective; in a few instances they're taken looking off to one side or the other.
Click on any picture to see a full-sized version.
These pictures were taken on a walk of the Charge (and the retreat) on May 15th, 2009. It started around 11:40am and ended an hour later. It followed the Charge from the Confederate lines to the Union's and back, which is west to east and then east to west.
It's useful to focus on a small set of landmarks during the walk. We found these the most useful. Going from west to east (from the Confederate to the Union lines) they are:
The fence to the north of the route and running east-west is post-and-rail on the west and changes to crossed-post in the east.
We basically followed the path of Archer's Brigade (under Col. Fry) to The Angle and back, though our starting point on the Confederate side was somewhat to the south of Col. Fry's.
If you're using the National Park Service map, the starting point was Stop 5. We started from the southern side of the "horseshoe" at the Virginia Memorial and came back to the north side of the horseshoe. Even as close as the two paths were, they were markedly different walking experiences.
We did not walk straight but followed the existing paths, which meander a bit. It also makes going over the rises easier than going straight up them.
| Time | Direction | Notes Zoom Regular |
|---|---|---|
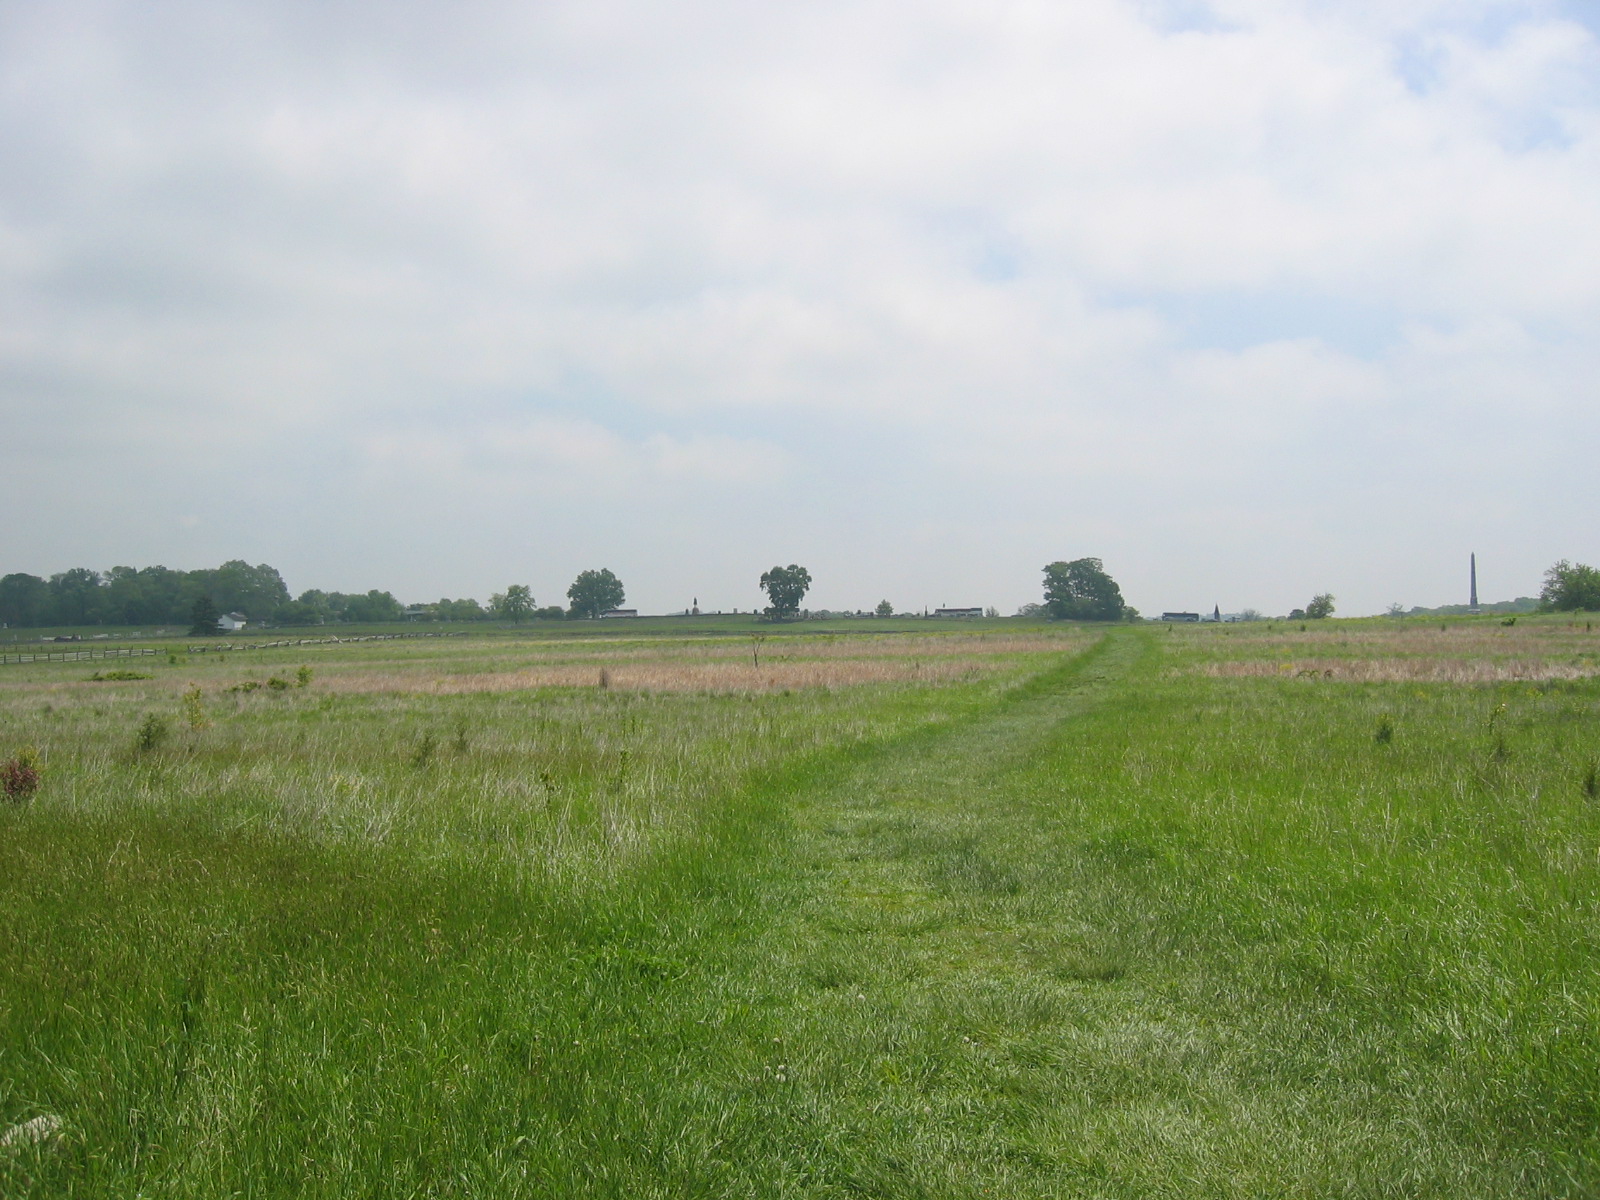
| 11:45 | Forward |


The tree on the horizon in the middle of the picture is at The Angle (this seems to be the way it's usually capitalized). The group of trees to the right is the Copse of Trees. The front of the Union lines are on the front of the ridge near the trees and extend back up and over the ridge. The Taneytown Road is not visible, being behind the ridge. During the preparatory Confederate cannonade the Union troops were also behind the crest. The yellow bus on the crest is on Hancock Avenue, not Taneytown Road. The walk is to The Angle, and then back on a track a little to the north of the route out, along the wooden fence seen extending toward the Union lines. About two-thirds of the way across is the Emmitsburg Road. In the Zoom there's a white bus that's traveling along it. For perspective, on the right side of the Regular (non-Zoom) picture are the buildings of the Codori farm. To the left is the Brian Barn (white building) and then the brick building of the old Visitor Center. The ground is quite undulating. This is clearly visible in the rise and fall of the fence line along the left. What you're not seeing are the intermediate depressions, one of which contains a crossed-post fence paralleling the Emmitsburg Road. |
| 11:51 | Forward |


We're following the track you see. |
| 11:54 | Forward |


You also get the idea that the next rise might not seem "gentle" when attacking an entrenched opponent. On the other hand, you are not visible to them, either. |
| 11:57 | Forward |


|
| 12:00 | Forward |


|
| 12:03 | Forward |

|
| 12:08 | Forward |


|
| 12:09 | Backward |


If you click on the Zoom picture and expand it, you will two groups of people in orange shirts to the left of the Virginia Memorial. One is back by the road, and the other is disappearing into the first depression. These are members of a tour group coming towards us, walking the route we did on the way over. A number are carrying flags. This group will disappear and reappear frequently during the remainder of the walk. |
| 12:11 | Forward |


|
| 12:11 | Backward |


|
It took almost a half hour to get to The Angle. We then spent some time in the area and then turned around to head back. The way back was a little more direct (no meandering) and took less time.
| Time | Direction | Notes Zoom Regular |
|---|---|---|
| 12:16 | Forward |


The route we followed out was to the left in the pictures, starting from where the two people (appearing as white dots) to the left of the Virginia Memorial (and just to the right of the gap in the post-and-rail fence) appear. Going back we follow the crossed-post fence on the right towards the Confederate lines (it turns into a post-and-rail fence partway across). That fence gives a good idea of the undulations we'll encounter. The groups in orange that were visible in the 12:09 picture have disappeared in the depression before the first (post-and-rail) fence. |
| 12:18 | Forward |


If you look closely at the Zoom picture, through the fence just to right of center are some members of the orange group, on a rise. They disappeared earlier on the left and are now coming up on the right. |
| 12:20 | Forward |


You can see a number of people of the orange group, though most are hidden in the swales. They're moving right to left at this point. |
| 12:24 | Forward |


You can't see any of the intervening land, just the upper parts of the Virginia Memorial and the trees. Almost everyone in the orange group has disappeared (there may be one member, just to right of center). You also see some of the marshiness you need to be prepared for. |
| 12:25 | Forward |


|
| 12:27 | Forward |


|
| 12:28 | Backward |


|
| 12:29 | To the left |


|
| 12:31 | Forward |


|
| 12:31 | Backward |


|
| 12:35 | Forward |


|
| 12:35 | Backward |


|
| 12:36 | Forward |


|
| 12:37 | Backward |


|
These pictures were taken on a walk of the Charge (and the retreat) on May 15th, 2010. It started around 11:40am and ended just over an hour later. It followed the Charge from the Confederate lines to the Union's and back, which is west to east and then east to west.
Click on any picture to see a full-sized version.
It's useful to focus on a small set of landmarks during the walk. We found these the most useful. Going from west to east they are:
We started close to where General Davis' Brigade pushed off from. Where Davis continued just to the north of the Bliss farm we passed south of it and then to The Angle. If you're using the National Park Service map, the starting point was Stop 4.
We took a couple of detours, such as the one to visit the Bliss farm memorial. The walk took slightly over an hour.
In general there are fewer well-worn trails on this route than on the Central (Archer) approach, which is the most popular with visitors. Be aware that there is quite a bit of vegetation that you will have to get through, as well as fences to get over.
| Time | Direction | Notes Zoom Regular |
|---|---|---|
| 11:41 | Forward |


The tree on the horizon in the middle is at The Angle; that's where this walk ends on the outbound trip. The group of trees to the right is the Copse of Trees. The Union lines are on the front of the ridge near the trees and extend back up and over the ridge. The Taneytown Road is not visible, being behind the ridge. During the preparatory Confederate cannonade the Union troops were also behind the crest. The Lakefront Lines buses on the crest are on the modern Hancock Avenue, not Taneytown Road. You see four fences appearing to run north-south (left to right); the farthest borders the Emmitsburg Road (we reach it in the 12:08 picture); you can see the tops of a couple of cars driving along it. The second fence out actually goes from the first fence to the third; you can see it clearly in the Regular view. For perpsective, on the Regular (non-Zoom) view is a pair of trees to the left of The Angle (a Lakefront Lines bus is at the base of the leftmost tree). The tall monument between them is the 39th New York Infantry Monument; the statue of General Meade on his horse is behind the rightmost tree and will appear in later pictures. We start in the direction of these trees before heading for The Angle. Farther to the left is the Brian Barn (white building) and then the brick building of the old Visitor Center. On the right side of the Regular (non-Zoom) picture are the large State of Pennsylvania Monument (white, with a dome) and the buildings of the Codori farm (very edge of the picture). |
| 11:43 | Forward |
 =
=
|
| 11:45 | Forward |


You can begin to see now that the second fence is really running from the near right to the far left, rather than paralleling the others. You can also pick up the top of another fence, before getting to the one at the Emmitsburg Road. |
| 11:46 | Forward |


|
| To the right |

| |
| 11:48 | Forward |


|
| 11:49 | To the right and a little back |


That's the first fence dipping away to the left (south), as we saw in the rightward-facing picture from 11:46. Beyond that is a crossed-post fence, with cannons in front of it. They are on a rise, so you can't see any of the ground beyond it before the trees. Likewise, any Confederate officers who were watching from there would have no view of our current position. To them we would seem to disappear and re-appear a number of times during the Charge. |
| 11:52 | Forward |


|
| 11:54 | Forward |


|
| 11:57 | Forward |


|
| 11:58 | To the left |


|
| 12:00 | Forward |


|
| 12:03 | Forward |


|
| 12:06 | Forward |


|
| 12:08 | Forward |


|
| 12:12 | Arrived |

|
It took almost a half hour to get to The Angle. We spent some time in the area and then turned around to head back. The way back was a little more direct (no meandering) and took less time.
| Time | Direction | Notes Zoom Regular |
|---|---|---|
| 12:18 | Forward |


Notice how good the view is from the base of the angle. We saw on the way over that a change of a few feet can make a marked difference in your view. If you move back up to the top Cemetary Ridge, you will see that the view that the Union officers had was better still. You can appreciate what an advantage it would be to an officer to be on horseback. |
| 12:24 | Forward |


If you haven't noticed it before, there is quite a lot of vegetation on this route, so be prepared. |
| 12:28 | Forward |


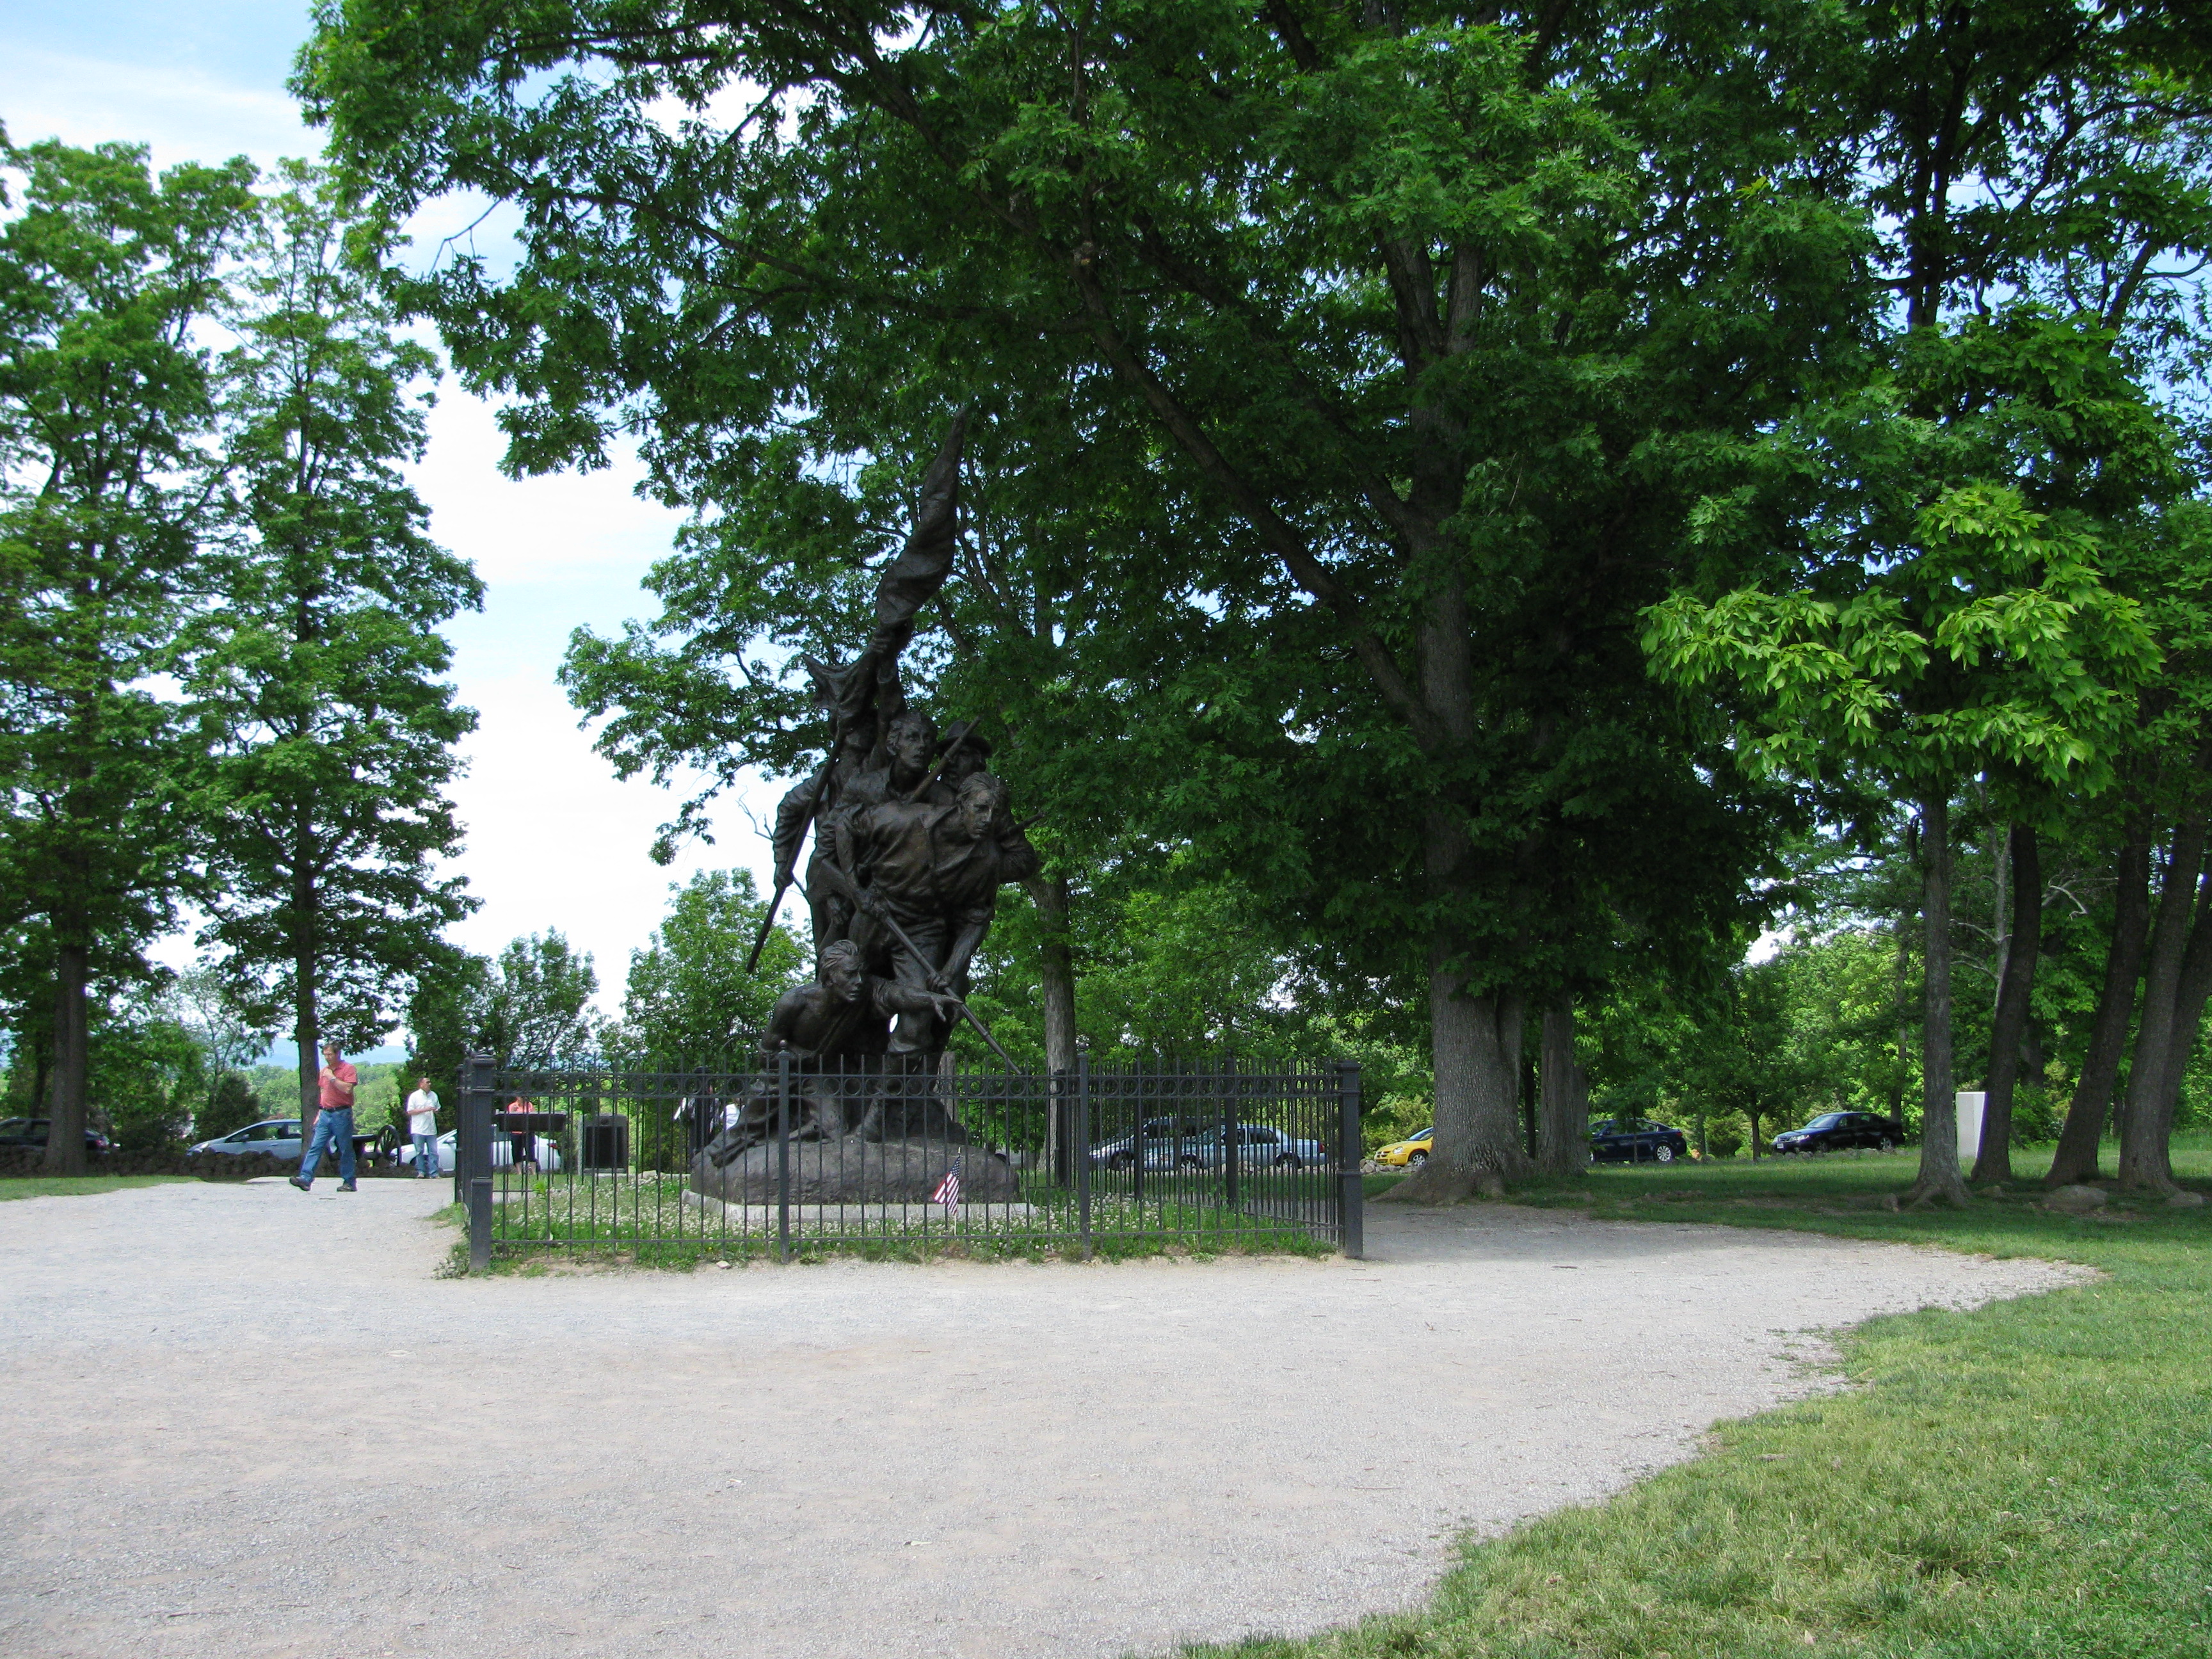
The North Carolina monument is visible (still marked by the two individuals just to the left of it). |
| 12:32 | Forward |


|
| 12:38 | Forward |


|
| 12:41 | Forward |


|
| 12:43 | Forward |


What we don't see is another fence, in the trough beyond the next intermediate rise. |
| 12:47 | Forward |


|
| 12:51 | Arrived |
|
Walking the route of the Charge, as recorded in the pictures, is the reason for this page. These are some of things that occurred to us during and after the walk.
If you spend most of your time driving rather than walking (and almost everyone does these days), your first reaction to seeing the area around The Angle on Cemetery Ridge may well be "that's a ridge?" It's barely a bump. Isn't a ridge something imposing, like Missionary Ridge in the Chattanooga Campaign?
Things look different on the ground. Even the slight elevations on Seminary and, especially, Cemetery Ridges make a big difference. Those holding the ridges have a much better view of the attackers, as well as much better protection.
Walking the route of the Charge can make you more sensitive to terrain differences in general.
The ground over which the Charge took place is often referred to as "slightly undulating". While none of the undulations are particularly steep, they are both frequent and deep. Commentary on this does not often go beyond the observation that the Confederates sometimes disappeared from the view of the Union lines.
But the Confederates were also out of view of others in their own unit, of others in other units, and of the officers on Seminary Ridge. This would have made coordination within and between units much more difficult, particularly when you consider the noise and gunsmoke on the field. At times you're not even sure of exactly where you are or where you should be going.
Besides the undulations, there is also a natural tendency to cut across the face of a rise, particularly when the goal cannot be kept in view.
This kind of terrain helps you understand the importance of signaling technology. We are accustomed now to radio communication and to airplane observation. The best the units on the ground had then were flags, drums, and bugles. There was also the human voice, but that is limited in range.
There were officers on horseback, which mitigated the problem somewhat, but they were not numerous and quickly became less so.
The terrain also helps you understand the accounts by the Confederate officers and non-coms of dressing and re-dressing the lines (i.e., getting the proper spacing between soldiers, so that they're neither too bunched up nor too dispersed) during the Charge.
This is not to say that the terrain made the Charge hopeless from the start nor that level terrain makes everything easy. Neither is true. But given the nature of the Union position and the forces there, it certainly contributed to the Confederates' difficulties.
As is often pointed out, the attack was hardly a "charge". Perhaps that term can be applied to the final advance up the slope of Cemetery Ridge, but the ground – and distance – don't support it earlier.
You wonder why the Confederates didn't send people out the night before to take down the fences, or at least open gaps.
The scale seems to change in jumps. When you start out, the opposite ridge seems quite a ways off. The distance seems to slowly decrease, and then, suddenly, you're almost there.
As we've seen, the routes followed by the various Confederate units were different in terms of length, fencing, and nature of the terrain. These differences added one more complication to the Confederate attack.
If you decide to walk the Charge, here are a few points that might help.
There is a very good chance you will encounter marshy areas, so wear sensible shoes. As mentioned above, this is groundwater seepage, not rain puddles, so you may run into them even if there has been no rain for days. And it shows up in surprising places, like on the slope leading to The Angle.
Watch how terrain features disappear and reappear during your walk. This is easy to overlook on a casual walk (having failed to notice this on earlier hikes ourselves). One of the best indicators of the shape of the land is the fences, how they rise and fall.
If you have a group, you might want to split it into two (or more) groups, with a time lag between the groups' departure. The other group will disappear and reappear during the walk. Sometimes you'll go over a rise, and the group in front won't be where you expected them.
One final reminder: dress appropriately. There are often marshy patches. There are fences to climb. There can be considerable patches of vegetation that is tough, tall, and spiky.
If you have any comments, questions, or related experiences, do e-mail me.
Last updated: April 17, 2016. Copyright 2005-2018, Andrew H. Weigel (AHW). E-mail: Web2013@andrewweigel.name.